Samstag, 28. Januar 2017

Stempeleinmaleins - Ausgabe vom 28. Januar 2017


Hallo Ihr Lieben!
Heute startet die neue Challenge beim Stempeleinmaleins, diesmal mit dem Thema "Schneemänner". Für Ende Januar super passend, wie ich finde.

Hello eveyone!
Today we are starting our new challenge over at Stempeleinmaleins. And we picked the theme of "snowman" for you this time. I think that fits perfectly for end of january.

Ich habe als Basis die Stanze aus der Vintage Box #4 verwendet und sie mit türkisblauem Cardstock hinterlegt. Darauf kam dann Papier mit Schneemanndruck. 
Als Motiv habe ich diese schneemannbauende Tilda verwendet und sie auf einen ausgestanzten Rahmen geklebt.

As the card base I went with the frame die from the Vintage Box #4 and put some turquoise/blue carstock behind it. On top of it I've put the designer's paper with a snowman print.
For the image I picked this Tild building a snowman and glued her on a die cut frame.


Neben dem Motiv war Platz für ein paar Zweige und diese Blume, die ich dreidimensional aufgebaut habe. Alle Stanzen waren ebenfalls in der Vintage Box.

Next to the image there was room for a few branches and this flower that I've build up 3 dimensional. All dies also came in that Vintage Box.


Oben habe ich ein Doily unter den Rahmen geschoben und darauf eine Schneeflocke geklebt. An der habe ich dann den Herztag aus dem Adventskalender von Magnolia gebunden.

In the top left corner I've put a doily underneath the frame and then glued a snowflake on top of it. Then I've tied the heartshaped tag from Magnolia's advent calendar to it.


Freitag, 27. Januar 2017

Ein Geburtstagskalender


Hallo Ihr Lieben!
Heute zeige ich Euch auf dem Kulricke-Blog einen Geburtstagskalender. Ich habe ja schon einige - einen für die Wand, einen für den Schreibtisch, aber in der Handtasche schadet einer ja auch nicht, oder? Und darum ist dieser Kalender im praktischen 13 x 9 Format entstanden.

Hello everyone!
Today I am sharing this birthday calendar over at the Kulricke Blog. I already have a few - one on my wall, one for my desk - but having one in your handbag is always handy, right? And so I made this one in a handy 9 x 13 cm size.


Vorne habe ich die Geburtstag PopUp Stanze verwendet und dahinter Designpapier und Cardstock geschoben. So hebt sich der Text gut ab.
Darüber ist das Nicht Vergessen Fähnchen aus dem Stempeset Plan - natürlich ausgestanzt mit der passenden Stanze - und darunter steht mehrfach "sehr wichtig" aus demselben Stempelset.
Die kleinen Sternchen neben dem Banner habe ich mit der Bordüren-Stanze aus dem Stanzenset Sternfunken gestanzt. Die macht auf einmal einige kleine Sterne in unterschiedlicher Größe.

On the front I used the Geburtstag PopUp die - which says birthday - and I've put some designer's paper and cardstock underneath it to make it have a good contrast.
There's a "don't forget" banner over and "very important" stamped underneath.
For the stars I've used the border from the  die set Sternfunken which makes several tiny stars in different sizes in just one cutting process.


Der süße Felix mit Torte passt natürlich prima auf einen Geburtstagskalender. Er balanciert auf dem G von Geburtstag. Hoffentlich fällt ihm die Torte nicht aus der Hand! Felix ist ebenfalls mit der passenden Stanze ausgestanzt. Die ist so praktisch und wirklich einfach zu benutzen. Legt einfach die Innenkanten der Stanze bündig an die Stempellinien und Ihr bekommt immer ein perfekt ausgestanztes Motiv.

The cute Felix with Cake is the perfect pick for a birthday calendar, isn't he? He's balancing on top of the G and I hope he doesn't drop that cake! Felix is cut out with the matching die which is so handy and easy to place, just match the inner lines of the die with the stamped lines and you'll always get a perfect cut out image.


Oben in der Ecke habe ich noch zwei der Nesting Ballons angebracht - und damit sie nicht wegfliegen, sind sie mit der Schnur am ersten G von Geburtstag angebunden.

To the top left corner I've added two of the Nesting Balloons - and to keep them from flying away I've tied them to the first G.


Innen habe ich dann 6 Bögen Cardstock mit den Maßen 8 x 12 cm eingeklebt. Sie sind oben gefalzt - die Originalgröße war 9 x 12 cm - und ich habe einen Rücken hinzugefügt, der bei jedem Blatt um 1 mm größer wird. Die Laschen habe ich dann aneinander geklebt, so lässt sich der Kalender auch gut umblättern.

Inside I've added six pages of 8 x 12 cm. They have a flap on top - original size of the pages was 9 x 12 - and I added a spine here getting 1 mm larger in size with every page. Then I glued the flaps together to be able to go through the pages easily.


Unten an den Seiten habe ich jeweils ein Tab angebracht, auf das ich die Monate aufgeklebt habe. Hierfür habe ich die Monate 1 Stanzen verwendet und da auf den Tabs nicht genug Platz gewesen wäre für die kompletten Monatsnamen, habe ich sie einfach gekürzt und nur die ersten drei Buchstaben aufgeklebt.
Die inneren Seiten sind mit einem Stempel von SU bestempelt.
To the bottom of each page I've added a tab on which I glued the months' names using the Monate 1 dies. The tabs weren't big enough for the whole names so I cut them smaller and only used the first 3 letters of each month.
The inner pages were stamped with a line stamp by SU.


Mittwoch, 25. Januar 2017

Zwei Mini-Karten


Hallo Ihr Lieben!
Heute zeige ich auf dem Stamping-Fairies Blog diese beiden Mini-Karte zum Valentinstag. Auf beiden habe ich das neue Abstract Heart von MFT verwendet - und eine Karte ist eher "männlich", die andere "weiblicher" geworden. 

Hello everyone!
Today I am sharing these two mini Valentine's cards over at the Stamping-Fairies Blog. On both I've used the new Abstract Heart die by MFT - and one turned out more manly, the other more soft for a woman.


Das ist die männlichere Karte, sie hat ein Maß von 11 x 11 cm. 
Ich habe grauen Cardstock verwendet, auf den ich ein paar schwarze Spritzer gegeben habe, und daraus das Herz ausgestanzt. Dann habe ich es nochmal aus schwarzem Cardstock gestanzt und hier nur das "Gerippe" verwendet. Die kleinen Flächen habe ich dann mit verschiedenen Farben gefüllt. Es war eine kleine Puzzlearbeit, bis ich alle kleinen Teile in den passenden Aussparungen hatte, aber der Effekt ist toll. 
Auf der Karte habe ich dann noch Punkte mit den Enamel Accents in Blue Ribbon, Coastal Cabana und Electric Lime verteilt, den Text,  mit dem Dymo gedruckt, angebracht und alles schwarz gemattet. Die untere Kante des schwarzen Cardstocks habe ich mit der geraden Stanze aus dem Stitched Scalloped Basic Edges 2 Stanzenset dekoriert.

This is the more manly card, it has a size of 11 x 11 cm.
I used grey cardstock that I added some black speckles to, and cut out the heart from it. Then I cut the heart again from black cardstock, only used the cut out outlines and filled in the small areas with pieces cut from different colors of cardstock. It was a bit of a jig-saw work until I found the fitting pieces but I love the effect.
I added some dots using Enamel Accents Blue Ribbon, Coastal Cabana and Electric Lime, the saying, printed with my Dymo, and then added some black matting. The lower edge of the matting cardstock was decorated using the straight line of the Stitched Scalloped Basic Edges 2 die set.


Einen Teil des Textes habe ich mit dem Well Connected Alphabet Stempelset und unterschiedlichen Farben, passend zu denen, die ich zum Füllen des Herzes verwendet habe, gestempelt. Dieses Alphabet ist einfach nur genial!
Ganz zum Schluss habe ich dann noch das Herz mit Glossy Accents überzogen, damit es schön glänzt.

A part of the saying was stamped using the Well Connected Alphabet stamp set using colors matching the ones I used to fill the heart. I just love this alphabet set!
At the end I covered the heart with Glossy Accents to make it shine.


Die "Damenkarte" habe ich in der Größe 12 x 12 cm gewerkelt.
Das Herz ist hier aus weißem Cardstock gestanzt und ich habe auch das weiße Gerippe verwendet. Auf dem weißen Cardstock habe ich rosafarbene Spritzer und ein paar Glitzersteine verteilt.
Gemattet ist der weiße Cardstock in weinrot. Den Bereich, der durch das Herz zu sehen ist, habe ich mit dem klaren Wink of Stella Brush angemalt, damit es schön glitzert. An der unteren Kante habe ich hier die gewellte Stanze aus dem Stitched Scalloped Basic Edges 2 Stanzenset verwendet.

The "woman card" is made in the size of 12 x 12 cm.
The heart has been cut from white cardstock and I also used the white outlines here.
I added some pink speckles and a few rhinestones to the white cardbase and matted it with burgundy cardstock. The area that can be seen through the cut out heart is covered with glitter using a clear Wink of Stella pen. The lower edge was cut using the wavy die from the Stitched Scalloped Basic Edges 2 die set.


Dekoriert ist die Karte dann mit diesen Rosen aus dem Stempelset Roses von Hampton Art. Es ist ein Set mit mehreren Stempelschritten und nachdem ich herausgefunden habe, dass man hier gar nicht genau arbeiten muss, weil das Ergebnis immer toll ist, war es super zu verwenden.
Der Text "love", gestempet in weinrot, ist ebenfalls in diesem Stempelset enthalten.

I decorated the card with these roses from the stamp set Roses by Hampton Art. Its stamps are layering stamps and after finding out that you don't have to work accurate because the result will always look good it was fun using it.
The saying, stamped using burgundy ink, also comes in this stamp set.


Montag, 23. Januar 2017

Love is in the Air


Hallo Ihr Lieben!
Heute zeige ich Euch mein zweites Januar-Werk für den Blog von Vildastamps. Ich hatte mich an den Schreibtisch gesetzt, die Kaffee-Karte von gestern gewerkelt - und dann fiel mir auf, dass ja Valentinstag ansteht. Und so hat diese zweite Karte zumindest etwas mit Liebe zu tun...

Hello everyone!
Today I am sharing my second january project for the Vildastamps blog. I sat at my desk, made yesterday's coffee card - and then realized that Valentine's is ahead. And so at least this second card is love themed...


Ich habe diesen Stempel aus dem Steampunk V695 Stempelset verwendet. Er ist auf weißen Cardstock aufgestempelt. Dann habe ich den Text mit glitzerndem Embossingpulver etwas hervorgehoben und anschließend das komplette Motiv mit klarem Embossingpulver überzogen. Nun glänzt es schön und durch den schwarz-weiß Look sieht es ein wenig aus wie ein altes Foto. Dann habe ich mittig in ein Designpapier ein Rechteck in etwas der Größe des Motivs geschnitten, die Ränder gerissen und nach oben gebogen und etwas Cheesecloth hinzugefügt. Das Motiv ist dann mit 3D-Tape unter das Designpapier geklebt, was für etwas Tiefe sorgt. Und die Blumen und Perlen sind direkt auf das Motiv geklebt, so dass sie nur etwas über den Rahmen hinausstehen.

I used this stamp from the Steampunkt V695 stamp set. It has been stamped on white designer's paper then I highlighted the text with some glittering embossing powder and covered the whole image with clear embossing powder. Now it has a nice shiny look and with its black and white colors it looks a tad bit like an old photograph. Then I've cut a rectangle about the size of the image from a sheet of designer's paper, teared the edges and rolled them up before adding some cheesecloth. The image has been cut underneath the designer's paper using 3D tape to add some depth. The flowers and pearls are glued onto the image as well so they are only slightly higher than the paper of the frame.


Rund um die Außenränder des Designpapiers habe ich den Grunge Swirl V540 gestempelt. So tut sich auch auf dem Papier etwas und die Ränder zur Kartenbasis sind etwas mehr hervorgehoben.

All around the outer edges of the designer's paper I've stamped the Grunge Swirl V540 stamp. It adds some to the designer's paper and also makes the contrast between the card base and the papers a little more noticable.


Seitlich habe ich diesen Herz-Tag von Magnolia auf die Karte geklebt, darunter befindet sich ein Zahnrad-Kreis von Noor!Design. Da das Tag ein wenig zu nackig aussah, unter dem Kreis aber verschwunden wäre, habe ich hier die Uhr aus dem Stempelset Coggwheelcorner with Clocks V711 in hellem Grau aufgestempelt. Und ein paar kleine Perlen machten sich hier auch gut.

Next to the image I've added this heartshaped tag by Magnolia, and there is a gear circle underneath it. Since the tag itself looked a bit plain but would have been lost underneath the circle I stamped one of the clocks from the Coggwheelcorner with Clocks V711 stamp set on it and added a few pearls here.


Sonntag, 22. Januar 2017

Eine Kaffee-Karte


Hallo Ihr Lieben!
Auch in diesem Jahr darf ich weiter im DT von Vildastamps sein - und jeden 21. des Monats etwas auf dem Vildastamps-Blog posten. Mein erstes Werk für diesen Monat ist diese Kaffee-Karte.

Hello everyone!
Also this year I am part of the Vildastamps DT - and will be posting something new every 21st of the month over at the Vildastamps-Blog. My first week for the month of january is this coffee card.

Ich habe hier auf meiner Karte einige Dinge im Küchendesign verwendet - z. B. das karierte Designpapier, das kleine Doily, die Spitzenbordüre von Magnolia und natürlich der Löffel-Charm. Das tolle Herz von Simon Says und die Zweige von Magnolia passten so toll zum verträumten Look.

I used quite a few things with a kitchen inspired look - like the checked designer's paper, the little doily, the lace border by Magnolia and of course the spoon charm. The great heart by Simon Says and the twigs by Magnolia went so great with the dreamy look of my card.


Hauptelement meiner Karte bildet der Kaffeebecher aus dem Coffee Kit V799 Stempelset. Ich habe ihn abgestempelt, rund um die Stempellinien ausgeschnitten, den Deckel und den Becher an sich coloriert und dann die Banderole per Paper Piecing dazugefügt. Das habe ich ewig nicht mehr gemacht und ich hatte mal wieder richtig Lust. Ich habe hier das gleiche Designpapier wie für die Basis der Karte verwendet um eine optische Verbindung herzustellen. Die beiden kleinen Kaffeebohnen sind Dies von Gummiapan.

Main element of my card is this coffee to go cup from the Coffee Kit V799 stamp kit. I stamped it on white paper, cut it out around the stamped lines, colored in the lid and the mug itself and then did some paper piecing for the sleeve. I haven't done any since ages and totally felt like doing it. I went with the same designer's paper that I also used on the card base to bring the designs together. Those small coffee beans are by Gummiapan.


In der Mitte der Karte habe ich dann das Doily aufgeklebt, darauf einen Kreis aus kraftfarbenem Cardstock gesetzt und darauf den Text aus dem Stempelset German Lyrics Oktoberfest V806 aufgestempelt. Kaffee und Chillen - das gehört doch zusammen!

In the middle I've added the doily and put a circle form craftcolored cardstock on top of it on which I've stamped the saying from the German Lyrics Octoberfest V806 stamp set. It says "relax" - and coffee and relaxation just go together, right?


Samstag, 21. Januar 2017

Stempeleinmaleins - Ausgabe vom 21. Januar 2017


Hallo Ihr Lieben!
In der heutigen Ausgabe des Stempeleinmaleins zeigen wir Euch einen kleinen Haftnotizblock-Halter. Der ist super für die Handtasche, denn die kleinen gelben Zettel pappen sonst meist überall dort, wo sie nicht kleben sollen.

Hello everyone!
In today's issue of Stempeleinmaleins we are showing you how to make this mini sticky note holder. I think it's great for handbags because these little things tend to stick to everything they are not meant to.

Ich habe auf der Vorderseite einen Aquarellhintergrund - war ein Rest einer anderen Karte - mit Buchstaben bestempelt und sie schwarz embosst. Darauf kam etwas Cheesecloth und die Notizen mit Herz Stanze von Kulricke. Drei kleine Glitzersteinchen, und schon war die Deko fertig. Ist ja auch nicht viel Platz.

I used a watercolor background - a left over piece from another card - and stamped letters on it which got embossed with black embossing powder. On top of it I've put some cheesecloth and a notes die by Kulricke. Three rhinestones and the decorations here were done. There's not a lot of room either.

Auf der Rückseite habe ich auf der Klappe einen kleinen Spruch angebracht.

On the back I've added a little text (remember this) to the flap.


Und auch innen habe ich ein klein wenig dekoriert - mit mehr Sprüchen. Und ein kleines Herz von dem Rest des bestempelten Hintergrunds hat es auch noch mit auf mein Werk geschafft.

Also on the inside I've added some decoration - more sayings (short note and don't forget). And a little heart, punched from the left over of the stamped background paper, also made it onto my project.


Freitag, 20. Januar 2017

Ein Tag mit meinem Gewinn von Sizzix


Hallo Ihr Lieben!
Im Dezember habe ich bei einem der Advents-Giveaways  von Sizzix auf deren Facebookseite gewonnen. Dienstag kam dann mein Paket - genau richtig, denn nach einem Tag in der Arbeit und einem Wochen-Großeinkauf kam ich gerade nach Hause, wohl wissend, dass noch ein riesiger Berg Dreckwäsche auf mich wartete. Aber beim Anblick des Pakets und vor allem des Inhalts war alles andere vergessen:

Hello everyone!
In december I was the lucky winner of the day 1 giveaway by Sizzix on their Facebook site. Tuesday I was driving home after a day at work and a week's grocery shopping and knowing that there would be a mountain of laundry waiting for me. And then there was this box waiting for me - and everything else was forgotten:


Die Box war voller wunderbarer Dinge: Tag-Thinlits, ein Piercing-Tool, eine Dimensional Cutting Platte, ein Schneeflockenstanzer, ein Embossing Difuser Set, neue Stanzplatten für die Big Shot, zwei weitere Thinlits-Sets, zwei Embossing-Folder, ein Pack Lederpapier und eine "Zauberfolie". WOW! Und natürlich wollte dann zumindest einiges davon ausprobiert werden, deshalb ist dieser Tag entstanden.

The box was loaded with amazing things: tag Thinlits, a piercing tool, Dimensinal Cutting Pad, a snowflake punch, an Embossing Difuser set, new cutting plates for my Big Shot, two more sets of Thinlits, two embossing folder, a pack of leather paper and a "magic foil". WOW! And of course I had to try out at least part of it. So this tag was made:


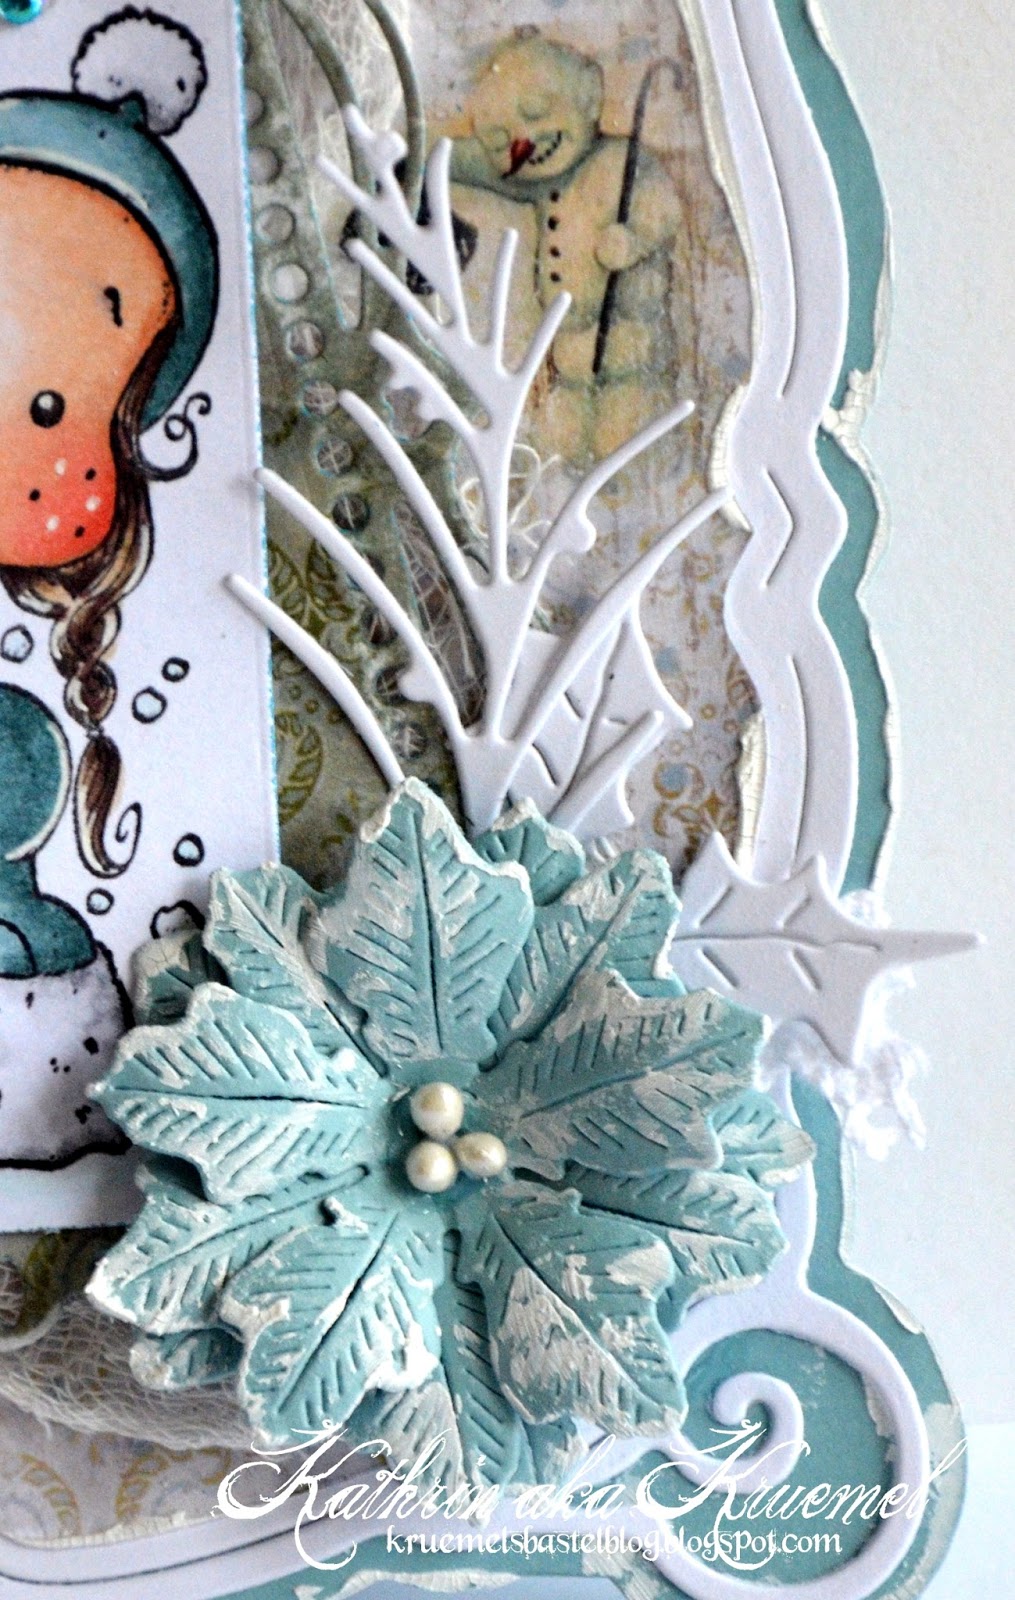
Ich habe die Tagstanze, das Lederpapier, einen der Embossing Folder, den Scribble Baum aus einem der Thinlit Sets und den quadratischen Embossing Difuser verwendet. Das Lederpapier habe ich geprägt und dabei das Quadrat in der Mitte ausgelassen, darein habe ich ein paar Tannen gestempelt und weiß embosst. Das Tag habe ich dann mit weißem Gesso bestrichen, um das Embosste etwas mehr rauszubringen.

I used the tag die, the leather paper, one of the embossing folders, the scribbled tree from one of the Thinlit sets and the square Embossing Difuser. The leather paper is dry embossed leaving out  a square in the middle where I stamped and heat embossed a few firs. Then I lightly covered the tag with white Gesso to bring the embossing out a bit more.


Hier seht Ihr den Baum, dahinter ist etwas Cheesecloth. Und davor steht der Schneemann von Magnolia. Ich habe außerdem ein klein wenig Designpapier, ein paar ausgestanzte Äste, eine Feder, eine Blume und einen beschneiten Tannenzapfen mit aufgeklebt und zuletzt noch ein Banner mit einem Text angebracht.

Here you see the tree and behind it there's some Cheesecloth. And this cute snowman is staning in front of the tree. I also added a tiny piece of designer's paper, a few cut out branches, a feather, a flower and a snowy pinecone and then also glued down a banner with the "magic of winter" text.


Oben am Tag habe ich Band, etwas Spitze, Tüll und eine ausgestanzte Schneeflocke angebunden und ganz zum Schluss noch 4 Glitzersteine auf den Tag geklebt.

To the top of the tag I've added some ribbon, tulle, and a cut out snowflake and then glued 4 rhinestones onto the tag.

Herzlichen Dank an Sizzix - ich bin immer noch hin und weg!
Huge thanks to Sizzix - I am still speechless!


Donnerstag, 19. Januar 2017

Eine Gutscheinkarte


Hallo Ihr Lieben!
Heute zeige ich Euch auf dem Kulricke-Blog diese Gutscheinkarte. Ich weiß, farblich so gar nicht das, was Ihr von mir gewohnt seid, aber es war so gewünscht... ;)

Hello everyone!
Today I am sharing this giftcard holder over at the Kulricke Blog. I know, it's not what you are used to see from me colorwise, but that's what was requested... ;)

Ich selbst versuche ja immer, Stanzen, die für eine bestimmte Jahreszeit gemacht sind, auch während des Rest des Jahres zu nutzen. Und so habe ich hier die Adventskalendertür-Stanze benutzt. Es ist die größere der Stanzen und darunter verbirgt sich eine Gutscheinkarte.

I am always trying to use those dies that are  made for a special time of the year also during the rest of the year. And so I used the advent calendar shutter die today to make this giftcard holder. It's the bigger of the dies and the giftcard is undereath.

Außerdem habe ich die Gutschein 2 Stanze für den Text auf dem Türchen benutzt. Der Text ist nicht ausgestanzt, sondern nur geprägt. Vor dem Prägen habe ich die Stanze vorsichtig mit Versamark betupft und anschließend goldfarbenes Embossingpulver darübergestreut. Da die Tinte nur auf den Linien der Stanze war, werden auch nur die embosst und der Text ist besser lesbar. Hier könnt Ihr es besser erkennen:

I also used a text die saying giftcard on the shutter. The saying wasn't cut but only embossed. Befor embossing it on the paper I used Versamark on the die and afterwards I've added some golden embossing powder. Since the ink was only on the raised lines of the die that's also where the powder will stick highlighting the outlines and making the text more noticable. Here you'll get a better look of it:


Ein paar Glitzersteinchen und die Sternfunken fanden ebenfalls noch Platz auf dem Türchen. Außerdem habe ich hier goldschimmerndes Farbspray über dem Cardstock verteilt.

A few rhinestones and the Sternfunken found their places on the shutter as well. I also added a golden shimmering spray on top of the cardstock.

Dann habe ich das Türchen mit der Geschenkkarte dahinter auf rosafarbenen Cardstock geklebt und darunter die Bordüre gesetzt. Als Deko habe ich dann noch eine große Blüte, gemacht mit den Blumen Set Stanzen, als Deko in die untere linke Ecke gesetzt.

Then I glued the shutter with the giftcard underneath on some pink designer's paper and put a border underneath. For decorations I used the Blumen Set dies to create this large flower in the bottom left corner.

Mittwoch, 18. Januar 2017

Valentinskarte mit Schokolade


Hallo Ihr Lieben!
Sonntag abend habe ich Euch ja bereits gesagt, dass ich jetzt im DT von AltairArt bin. Und heute zeige ich meinen ersten Inspirations-Post auf dem AltairArt Blog. Normalerweise werde ich das immer am 7. eines Monats tun, aber diesen Monat ist es ausnahmsweise der 18. 

Hello everyone!
I already told you sunday night that I am a member of the AltairArt DT now. And today I am sharing my first inspiration post over at the AltairArt Blog. Usually I'll do so on the 7th of each month but in january it will be the 18th.


Ich habe diese Valentinskarte mit Schokoladenfach gemacht. Hellblau und rosa passen super zu Valentin und ich habe etwas grau und weiß dazu kombiniert.
Das Hintergrundpapier ist aus dem Papierblock Signs of Love. Ich finde es so toll mit der Holzoptik und zudem hat es weiß aufgedruckt kleine Poststempel.

I made this valentine's card with an envelope for chocolat. Light blue and pink always go great with Valentine's and I've added some grey and white to it.
The background paper is from the Signgs of Love paperpack. I just love it with the wooden print and it also has some postal stamps printed on in white.


Die übrigen Papiere sind aus der Ever and Always sowie der Blue Rose Reihe. Ich habe ein rosafarbenes mit ganz feinem Rosendruck sowie Papiere mit Punkten - und Rosen auf der anderen Seite - verwendet, um die Karte weiter zu dekorieren. Dazu gehört unter anderem ein herzförmiger Tag. Ein paar Röschen, Schnörkel und Glitzersteine durften auch nicht fehlen.

The other papers are from the Ever and Always and the Blue Rose Collections. I went with a light pink one with a very soft roses print and papers with dots - and roses on the backside - to decorate my card. There is a heartshaped tag, a few roses, flourishes and rhinestones.


Wie gesagt habe ich einen Umschlag mit auf der Karte eingearbeitet, in den eine kleine Tafel Schokolade passt. Da die Papiere doppelseitig sind, sieht die Karte aber auch noch schön aus, wenn die Schokolade rausgenommen/gegessen ist. Das kann man auf dem nächsten Bild sehen:

As I mentioned before I've added an envelope to my card that holds a small bar of chocolat. Since the papers are doublesided the card will still look nice once the chocolat has been taken out/eaten. You can see that on the next picture.


Hier sieht man dann auch, dass ich auch die Schokolde etwas dekoriert habe.

Here you can also see that I decorated the chocolat a bit.


Farblich passte sie so gar nicht ins Konzept. Also habe ich sie mit einer weißen Banderole versehen, so dass nur ein wenig der schwarzen Umverpackung zu sehen ist. Darauf kam dann ein Stück des rosafarbenen Designpapieres, auf das ich vorher den Text aus dem Schokolade 3 Stempelset von Kulricke gestempelt habe. 
Da ich die Haare von Tilda schwarz coloriert habe, wiederholt sich auch dies und somit passt die Schokolade optisch zur Karte.

The chocolat so didn't match the color scheme of my card. So I wrapped a white banderole around it only leaving a small part of the black packing visible. On top of the white paper I've added a rectangle from the pink AltairArt paper on which I stamped a saying by Kulricke meaning "you're like my favourite brand of chocolat: sweet and cute!". 
Since I've colored Tilda's hair in black the chocolat with that hint of black now matches the colors of my card.


Sonntag, 15. Januar 2017

Challenge #1 bei AltairArt und eine Neuigkeit


Hallo Ihr Lieben!
Diese Karte habe ich für die heute startende Challenge bei AltairArt gemacht. Und da kommen wir gleich zur Neuigkeit: ich darf im DT von AltairArt dabei sein! AltairArt ist eine Firma aus Polen, die ganz wunderbare Designpapiere herstellt. Ich hatte sie mir online angesehen und war begeistert. Als ich dann mein DT-Paket bekam war ich wirklich hin und weg. Die Prints sind wirklich toll und genau nach meinem Geschmack, alle Papiere sind doppelseitig und die Grammatur ist mit 250 g ebenfalls super. Ihr werdet also mehr davon sehen! 
Für meine Karte zum Challengethema "Gears and Wheels" habe ich Papiere aus der ganz neuen Serie "Tears in the Rain" verwendet. Die habe teilweise bereits Zahnräder aufgedruckt und passten somit super.

Hello everyone!
I made this card for the new challenge at AltairArt which starts today. And here are some great news: I am a member of the AltairArt DT! AltairArt is a company from Poland producing amazing designer's papers. I checked those online before applying their DT call and really loved them. And when I got the papers I was over the moon. The prints are wonderful and exactly what I love, they are all doublesided and have a weight of 250 g which is great, too. So be prepared to see more of these!
For the card I made for the challenge with the theme "gears and wheels" I used some papers from the brand new Tears in the Rain collection. Some of them already have gears printed on them and so they were the perfect choice.

Ich habe eines der 15 x 15 cm Papiere als Hintergrundpapier genommen, ein Quadrat mit einem soften Notenmuster schräg darauf gesetzt und darüber kam ein Kreis mit einem shabby Holz Design. Die Papiere habe ich weiß gemattet und die Ränder weiß eingestrichen.

I used one of the 15 x 15 cm papers for the background, put a square with a soft notes prints turned a bit on top of it and then added a circle with a shabby wood pattern. The papers have been mattet and I put some white Gesso on the edges.


Der Tag, den ich nicht auf der Karte festgeklebt sondern ihn nur zwischen die Lagen gesteckt habe, so dass er herausgezogen werden kann, kommt so ebenfalls aus dieser Papierreihe. Ich habe ihn nur ausgeschnitten, die Ränder mit Gesso bestrichen und etwas Spitze, Band und eine Blume hinzugefügt.

The tag, that I didn't glue on the card but put it inbetween those layers so it can be pulled out, is also from this collection of papers. I just cut it out, added Gesso to the edges again and then used some white string to tie the lace and flower to it.


Und auch der Dare to be a Dreamer text war schon fertig so. Ich habe ein Ticket verwendet, um ihn auszustanzen.
Den Kreis habe ich mit einem Zahnradkreis hinterlegt und darauf das DieCut mit der Uhr und den Zahnrädern gesetzt.
Unter dem Text sind noch ein paar Blumen, Perlenstränge und Organzaband.

And also the dare to be a dreamer saying came like this in the pack of papers. I used a ticket die to cut it out.
Behind the circle I've put a gear circle and then put a diecut watch with gears on top of it.
Under the text there are some flowers, pearl strands and some organza ribbon.


Natürlich durfte auch ein Motiv nicht fehlen. Ich habe dieses Gorjuss Mini mit der Taschenuhr genommen - die passte perfekt zum Thema.

Of course I also wanted to add an image and went with this Gorjuss mini with the watch because she just got great with the theme.

Ich hoffe, Ihr macht bei der Challenge mit - Ihr müsst dafür auch keine AltairArt Papiere verwenden, wenn Ihr keine habt!

I hope you join the challenge - you even don't have to use AltairArt papers if you don't have any.